Why Hand Stripping Matters — And What Happens When You Skip It
Half the internet says just clip it, the other half acts like you need a European apprenticeship to touch a wire coat. I ruined a perfectly good coat with clippers the first year I owned my griffon and spent three strip cycles undoing the damage. What I know now would have saved me all of that.
My griffon is a male named Birch. The groomer handed him back to me after his first professional groom and said, almost as an afterthought, “You really should be hand stripping this dog, not clipping.” I nodded like I understood. I had absolutely no idea what that meant. Got home, looked it up, found a twelve-year-old forum post and a grainy video with 400 views. That was the entire body of accessible knowledge on griffon hand stripping at the time. Things have gotten marginally better since, but not by much.
This article includes affiliate links. We may earn a commission at no extra cost to you.
Here is everything you need to know to do this at home, from someone who learned the hard way and genuinely wishes someone had walked him through it before the clipper incident.
The Coat Science — Why Clippers Ruin Everything
But what is a wire coat, really? In essence, it is a harsh, stiff topcoat produced by the natural hair follicle cycle — the texture is a function of how the hair grows, not just genetics. But it is much more than that, and understanding the growth cycle is what makes everything else click.
When a wire coat hair dies at the root, a new harsh hair pushes up behind it. Pull the dead hair out at the root — that is hand stripping — and the replacement grows in correctly: stiff, water-resistant, the right color, the right texture. The coat that protects your dog in cattail marshes and multiflora rose tangles is maintained by this process.
Clip it instead — run electric clippers through the topcoat — and you sever the dead hair midshaft. The follicle interprets this as job done and does not push a fresh wire coat through. What grows back is soft, slightly wavy, and faded in color. I watched it happen to Birch in real time after his first clipper groom. His chestnut and steel coat came back looking washed out and fluffy, like a different dog entirely. It took three full strip cycles — about a year and a half — before the wire texture fully recovered. Save yourself the trouble.
Probably should have led with this section, honestly — because that groomer’s offhand comment was trying to save my dog’s coat, and I ignored it for six months.
Recognizing a Blown Coat — When to Actually Strip
Griffons blow their coat two to three times per year. A blown coat is ready to strip and makes everything dramatically easier — strip at the right moment and the hair practically falls out in satisfying clumps. Strip too early and you are fighting the follicle, the dog is uncomfortable, and you are both having a bad afternoon.
Signs the coat is blown and ready to go:
- The topcoat looks dull and slightly wavy rather than crisp and harsh
- When you grab a small section and tug gently, hair comes out without much resistance
- You can see undercoat pushing through in patches, giving the coat a layered or fluffy appearance
- More hair than usual coming off on furniture and your clothing — my couch becomes a forensic evidence scene
If you tug a section and the hair just does not budge, it is not blown yet. Give it two or three more weeks. On Birch, the coat blows reliably right around when daylight starts shifting noticeably in spring and again in early fall. Your dog will develop a rhythm you will start to recognize after the first year.
Tools You Actually Need — And the One to Avoid
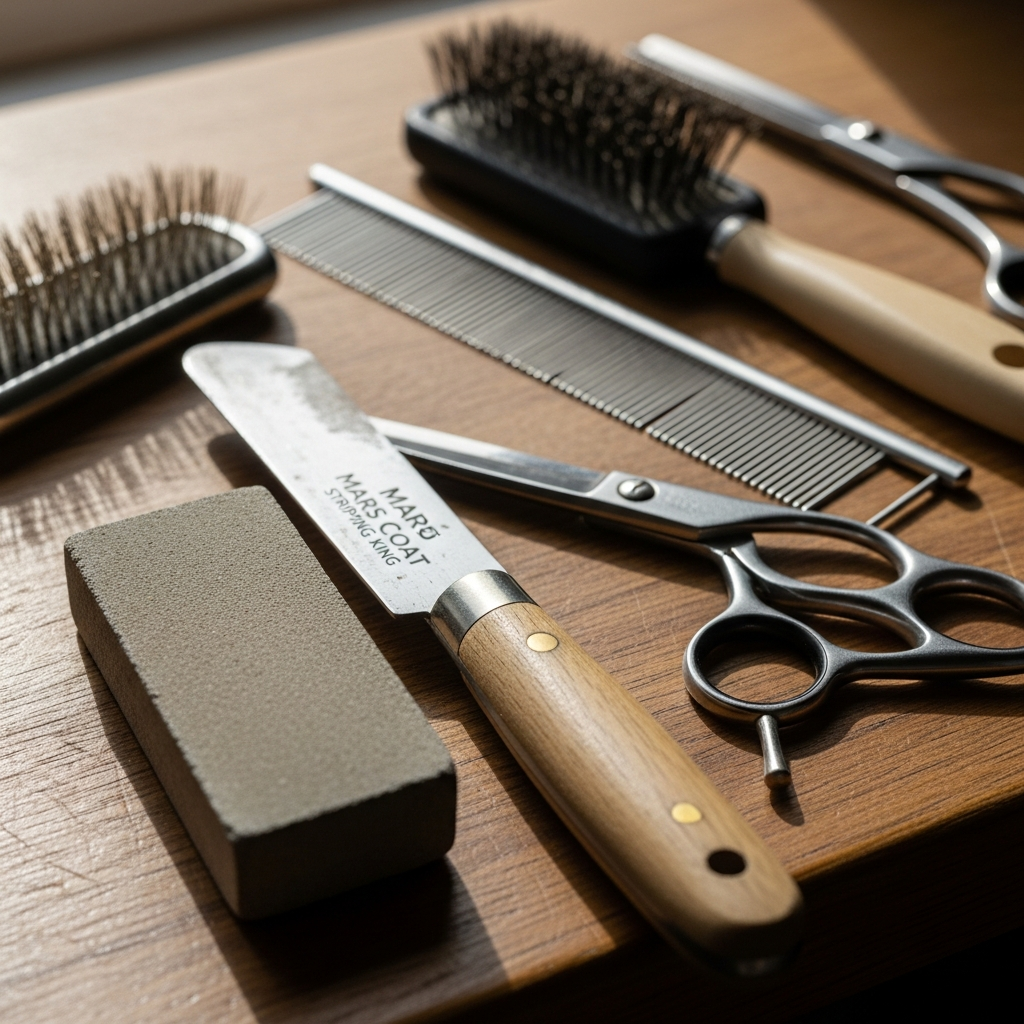
You do not need a lot of equipment. I spent way too much money on specialty grooming tools early on before figuring out that four things do the entire job:
- FURminator deshedder, medium or large: For the undercoat — the soft, downy layer under the wire topcoat. Use this first to clear undercoat and make the topcoat accessible. Do not run it through the topcoat itself.
- Mars Coat King stripping knife, medium blade: Your primary tool for the body topcoat. The serrated blade grips and pulls dead hair cleanly. Light pressure, short strokes, always following the direction of coat growth. This is the one tool that changed everything for me.
- Stripping stone or pumice stone: For finishing work and areas where the knife is too coarse. Good for blending transitions and for working on the head where you need more control.
- Your fingers: Genuinely the best tool for the head, ears, and anything delicate. Thumb and index finger, small sections, pull with the growth direction. I do about half of every session with just my hands now.
The one to avoid: electric clippers on the topcoat. Clippers on the undercoat — belly, armpits, sanitary areas — are completely fine and actually recommended. But keep them off the body topcoat if you want to preserve that wire texture. I happen to be still bitter about the clipper incident. Fair enough.
Step by Step — Your First Home Strip Session
Clear two hours if this is your first time. Once you find your rhythm you will get faster — I am down to about 90 minutes for a thorough session now, though the first time took closer to two and a half hours and produced enough loose hair to build a second dog.
Step 1 — Bathe and fully dry the dog. Clean coat strips more easily than dirty coat. Dry thoroughly — damp hair is slippery and impossible to grip. Skip conditioner entirely. It softens the hair and kills your grip. I use a basic oatmeal dog shampoo and nothing else.
Step 2 — Deshed the undercoat first. Work the FURminator through the entire body coat, going with the direction of growth. Remove as much loose undercoat as possible before you touch the topcoat. This gives you a clean working surface and makes the topcoat much more accessible. Birch actually enjoys this part — leans into it like a massage.
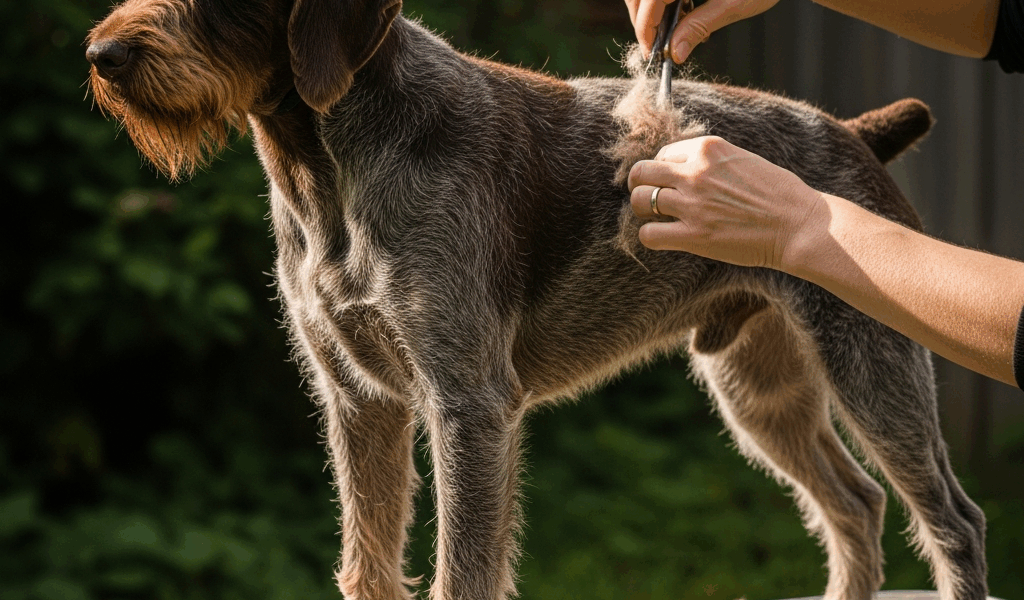
Step 3 — Start at the neck and shoulders with the stripping knife. This is the least sensitive area and the best place to find your grip pressure. Hold the knife loosely, use your free hand to keep the skin taut, and pull with the direction of coat growth using short strokes. You will see dead hair coming out in small clumps — that is exactly what you want. It should not hurt the dog. If your griffon is squirming or flinching, you are probably pulling against the grain or taking too large a section. Reduce the amount of hair in each grab.
Step 4 — Work back toward the tail in sections. Back, sides, rump, then down the legs. The coat direction changes in different areas — always feel which way the hair lays before pulling. For the tail, use fingers or the stripping stone rather than the knife. It is easy to overdo the tail and end up with a thin, stripped-looking tail that you will regret. I overdid Birch’s tail once and it took two months to fill back in. Looked ridiculous at the NAVHDA test.
Step 5 — Clear the undercoat from the chest and belly with clippers. The belly coat is typically soft and clipping is appropriate here. Keep the line clean where clipped areas meet the body topcoat. This is the one area where clippers are your friend.
Take breaks. Let your dog wander around and shake out. This does not have to be a continuous session, especially on the first attempt. Birch and I usually take a ten-minute break halfway through where he gets a treat and I stretch my hands out.
Head and Ears — A Completely Different Approach
Head and ears need a completely different touch. No stripping knife near the face — full stop. I cannot emphasize this enough.
For the skull, cheeks, and top of the muzzle, use your fingers only — thumb and index finger, small sections, pulling with the direction of growth. Use the stripping stone around the eyebrow area to tidy and blend without pulling aggressively. Leave the eyebrow tufts fairly full — they are characteristic of the breed and you do not want to strip them flat. That scruffy eyebrow look is half the reason people fall for griffons in the first place.
For the ears, work only on the outer flap with fingers only. The skin there is thin and sensitive. Never use the stripping knife on ear flaps. Leave the inner ear completely alone — if ear hair inside the canal needs attention, that is a vet conversation, not a home grooming task.
Under the eyes and around the muzzle: skip stripping entirely. Small grooming scissors to tidy if needed. The goal is clean and neat without irritating skin near the eyes.
How Often — And Why Maintenance Between Sessions Matters
Two to three full strips per year is the baseline for a companion dog. If your griffon hunts hard through heavy cover — and mine does — the coat takes more abuse and probably needs that third annual strip plus some light maintenance in between. I spend about ten minutes every couple of weeks with my fingers, pulling out the most obvious dead patches while Birch lies on the living room floor. It has become genuinely meditative. My partner thinks it is bizarre. She is probably right.
That’s the part about the grooming routine that griffon owners appreciate — it becomes this quiet, regular thing between you and your dog that nobody else quite understands.
That maintenance habit makes the full strip sessions significantly faster and more comfortable for the dog. Built-up dead coat also traps moisture and can cause skin irritation underneath, so there is a comfort argument beyond just aesthetics.
The first session is the longest and hardest. By the third or fourth, you will know your dog’s coat rhythm, your grip pressure will be calibrated, and 90 minutes will feel comfortable. Most griffon owners end up doing this themselves rather than paying a groomer — partly because it is not that hard once you have done it, and partly because most groomers, honestly, do not have hands-on experience with wire coats specifically. Your dog and your coat will thank you for learning.


Stay in the loop
Get the latest griffist updates delivered to your inbox.